Vue.js:渐进式 JavaScript 框架,相关资料整理

// TODO: To be updated…
1. 使用 vue-cli 构建新项目
1.1 安装 vue-cli
安装vue-cli:
# 安装 Vue CLI
> npm install -g @vue/cli

# 或者使用 yarn
> npm i -g yarn
> yarn global add @vue/cli

# 验证 Node.js 与 vue-cli 版本
> node -v
v12.13.0
> npm -v
6.13.0
> vue -V
@vue/cli 4.0.5

> vue
Usage: vue <command> [options]                                                                                                                                                  u

Options:
  -V, --version                              output the version number
  -h, --help                                 output usage information

Commands:
  create [options] <app-name>                create a new project powered by vue-cli-service
  add [options] <plugin> [pluginOptions]     install a plugin and invoke its generator in an already created project
  invoke [options] <plugin> [pluginOptions]  invoke the generator of a plugin in an already created project
  inspect [options] [paths...]               inspect the webpack config in a project with vue-cli-service
  serve [options] [entry]                    serve a .js or .vue file in development mode with zero config
  build [options] [entry]                    build a .js or .vue file in production mode with zero config
  ui [options]                               start and open the vue-cli ui
  init [options] <template> <app-name>       generate a project from a remote template (legacy API, requires @vue/cli-init)
  config [options] [value]                   inspect and modify the config
  outdated [options]                         (experimental) check for outdated vue cli service / plugins
  upgrade [options] [plugin-name]            (experimental) upgrade vue cli service / plugins
  info                                       print debugging information about your environment

  Run vue <command> --help for detailed usage of given command.
1.2 构建新项目
构建一个新项目:
> vue create my-project
或者使用可视化界面:
> vue ui
1.3 目录结构
vue-cli脚手架生成的项目目录结构大致如下所示:
├── node_modules     # 项目依赖包目录
├── public
│   ├── favicon.ico  # ico 图标
│   └── index.html   # 首页模板
|
├── src
│   ├── assets/      # 样式图片目录
│   ├── components/  # 组件目录
│   ├── views/       # 页面目录
│   ├── App.vue      # 父组件
│   ├── main.js      # 入口文件
│   ├── router.js    # 路由配置文件
│   └── store.js     # vuex 状态管理文件
|
├── .gitignore       # git 忽略文件
├── .postcssrc.js    # postcss 配置文件
├── babel.config.js  # babel 配置文件
├── package.json     # 包管理文件
└── yarn.lock        # yarn 依赖信息文件

2. 包管理工具与配置项
2.1 npm 与 package.json
- npm 是 Node Package Manager 的缩写
- 也是目前世界上最大的开源库生态系统
包管理文件package.json的内容大致如下:
详细的
package.json文件配置项可以参考:npm-package.json | npm Documentaion
{
    "name": "my-project",
    "version": "0.1.0",
    "private": true,
    "scripts": {
        "serve": "vue-cli-service serve",
        "build": "vue-cli-service build",
        "lint": "vue-cli-service lint"
    },
    "dependencies": {
        "vue": "^2.5.16",
        "vue-router": "^3.0.1",
        "vuex": "^3.0.1"
    },
    "devDependencies": {
        "@vue/cli-plugin-babel": "^3.0.0-beta.15",
        "@vue/cli-service": "^3.0.0-beta.15",
        "less": "^3.0.4",
        "less-loader": "^4.1.0",
        "vue-template-compiler": "^2.5.16"
    },
    "browserslist": [
        "> 1%",
        "last 2 versions",
        "not ie <= 8"
    ]
}
2.2 npm 常用命令
在项目的构建和开发阶段,常用的npm命令有:
# 生成 package.json 文件(需要手动选择配置)
npm init

# 生成 package.json 文件(使用默认配置)
npm init -y

# 一键安装 package.json 下的依赖包
npm i

# 在项目中安装包名为 xxx 的依赖包
npm i xxx

# 在项目中安装包名为 xxx 的依赖包(配置在 dependencies 下)
npm i xxx --save

# 在项目中安装包名为 xxx 的依赖包(配置在 devDependencies 下)
npm i xxx --save-dev

# 全局安装包名为 xxx 的依赖包
npm i -g xxx

# 运行 package.json 中 scripts 下的命令
npm run xxx
比较陌生但实用的有:
# 打开 xxx 包的主页
npm home xxx

# 打开 xxx 包的代码仓库
npm repo xxx

# 将当前模块发布到 npmjs.com,需要先登录
npm publish
2.3 yarn 常用命令
yarn 是由 Facebook 推出并开源的包管理工具,具有速度快、安全性高、可靠性强等优势
yarn的常用命令如下:
# 生成 package.json 文件(需要手动选择配置)
yarn init

# 生成 package.json 文件(使用默认配置)
yarn init -y

# 一键安装 package.json 下的依赖包
yarn

# 在项目中安装包名为 xxx 的依赖包(配置在 dependencies 下),同时 yarn.lock 也会被更新
yarn add xxx

# 在项目中安装包名为 xxx 的依赖包(配置在配置在 devDependencies 下),同时 yarn.lock 也会被更新
yarn add xxx --dev

# 全局安装包名为 xxx 的依
yarn global add xxx

# 运行 package.json 中 scripts 下的命令
yarn xxx

# 查看 yarn 配置项
yarn config list
比较陌生但实用的有:
# 列出 xxx 包的版本信息
yarn outdated xxx

# 验证当前项目 package.json 里的依赖版本和 yarn 的 lock 文件是否匹配
yarn check

# 将当前模块发布到 npmjs.com,需要先登录
yarn publish
2.4 第三方插件配置
例如在package.json中的browserslist配置项,其主要作用是在不同的前端工具之间共享目标浏览器和 Node.js 版本:
"browserslist": [
    "> 1%",            // 表示包含所有使用率 > 1% 的浏览器
    "last 2 versions", // 表示包含浏览器最新的两个版本
    "not ie <= 8"      // 表示不包含 ie8 及以下版本
]
也可以单独写在.browserslistrc文件中:
# Browsers that we support
> 1%
last 2 versions
not ie <= 8
或者在项目终端运行如下命令查看:
> npx browserslist
and_chr 78
and_ff 68
and_qq 1.2
and_uc 12.12
android 76
baidu 7.12
bb 10
bb 7
chrome 78
chrome 77
chrome 76
edge 18
edge 17
firefox 70
firefox 69
ie 11
ie 10
ie_mob 11
ie_mob 10
ios_saf 13.0-13.2
ios_saf 12.2-12.4
kaios 2.5
op_mini all
op_mob 46
op_mob 12.1
opera 64
opera 63
safari 13
safari 12.1
samsung 10.1
samsung 9.2
2.5 vue-cli 包安装
除了使用npm和yarn命令对包进行安装和配置之外,vue-cli从3.0版本开始还提供了专属的vue add命令:
- 该命令安装的包是以
@vue/cli-plugin或者vue-cli-plugin开头的包 - 即只能安装 Vue 集成的包
# vue-cli 会将 eslint 解析为 @vue/cli-plugin-eslint
vue add eslint
注意:不同于
npm或yarn的安装,vue add不仅会将包安装到项目中,还会改变项目的代码或文件结构
另外vue add中还有两个特例:
# 安装 vue-router
vue add router

# 安装 vuex
vue add vuex
这两个命令会直接安装vue-router和vuex并改变你的代码结构,使你的项目集成这两个配置。
3. Webpack
3.1 与 vue-cli 2.x 的差异
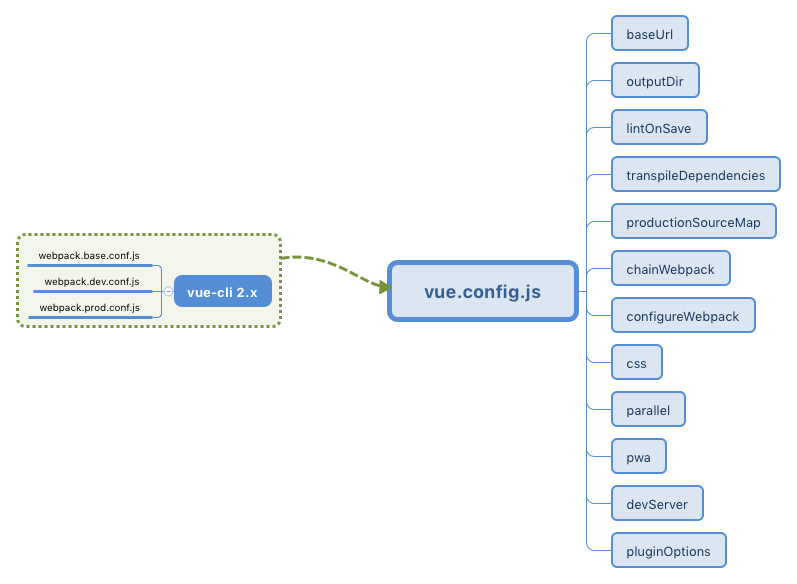
vue-cli 3.x提供了一种开箱即用的模式,无需配置webpack即可运行项目。并且还提供了一个vue.config.js文件来满足开发者对其封装的webpack默认配置的修改:

// TODO: To be updated…
参考资料
1. JavaScript
2. Node.js
教程
npm
axios
axios - Promise based HTTP client for the browser and node.js | Github
使用 axios 访问 API | Vue.js
 axios 库从使用入门到进阶 - jonnyshao | 掘金
- axios 的基本使用 | Aitter’s Blog
3. Vue
官方文档
开发教程
开源项目
MVVM
ESLint
使用 Iconfont
- Iconfont - 阿里巴巴矢量图标库
- Vue、Element-ui项目中如何使用Iconfont(阿里图标库) | CSDN
- 如何在 Vue 项目中使用阿里的 Iconfont | 掘金
- Vue 项目中引入 Iconfont | 掘金
Vue.js + Go
Vue.js + Element-ui
4. UI 框架
- Top 5 React Frameworks / UI Component Libraries for 2019
- 20+ Best React UI Component Libraries / Frameworks for 2019 | codeinwp
Vue、React、Angular 最佳 UI 框架 | FunDebug
- 构建 React.js 应用的十佳 UI 框架 | 开源中国
Vue
React
ECharts
- vue-echarts - ECharts 的 Vue.js 组件 | Github
- Vue-ECharts Demo
- 如何在 Vue 项目中使用 echarts | 掘金
- 在 Vue 中使用 echarts 的两种方式 | SegmengtFault
5. Element-ui
跨域访问
- axios 可以解决跨域访问的问题吗?| SegmentFault
- vue axios 请求出错 No ‘Access-Control-Allow-Origin’ header is present on the requested resource | 简书
table 布尔值的回填
先在<el-table-column>中指定:formatter:
<el-table :data="rows" ref="datagrid" border="true" highlight-current-row="true" style="width: 100%">
    <el-table-column prop="tableId"
        label="表id"
        :show-overflow-tooltip="true">
    </el-table-column>
    <el-table-column prop="pk"
        label="是否为主键"
        :formatter="formatBoolean" :show-overflow-tooltip="true">
    </el-table-column>
</el-table>
之后在methods中添加formatBoolean:
// 布尔值格式化:cellValue为后台返回的值
formatBoolean: function (row, column, cellValue) {
    var ret = '';   //你想在页面展示的值
    if (cellValue) {
        ret = "是"; //根据自己的需求设定
    } else {
        ret = "否";
    }
    return ret;
},
table 表格内容格式化
设置formatter或filter,参见:
table 表格筛选
坑在于<el-table-column>要加prop和column-key,参见:
table 多选
先手动添加一个<el-table-column>,并设置其type属性为selection:
<el-table-column type="selection" width="55" />
添加一个<el-button>,方便清除所有选择:
<el-button type="primary" @click="toggleSelection()">取消选择</el-button>
最后在methods中实现toggleSelection():
toggleSelection(rows) {
  let selectedRows = this.$refs.userTable.store.states.selection;

  selectedRows.forEach(row => {
    console.log("id: ", row.id, " name: ", row.name);
  });

  if (rows) {
    rows.forEach(row => {
      this.$refs.userTable.toggleRowSelection(row);
    });
  } else {
    this.$refs.userTable.clearSelection();
  }
}
多选的行数据这样获取:
let selectedRows = this.$refs.userTable.store.states.selection;
参见:
table 表格分页
- Element-ui(el-table、el-pagination)实现表格分页 | 博客园
- Vue2.5 结合 Element UI 之 Table 和 Pagination 组件实现分页 | 掘金
button 动态设置禁用
设置<el-button>的:disabled:
<template slot-scope="scope">  //这里需要注意一下
    <el-button type="primary"
        :disabled="scope.row.state == '已完成'"
        size="small"
        @click="dialogFormVisible = true">
        操作
    </el-button>
</template>
msgbox 的关闭
调用done()关闭:
this.$msgbox({
  title: '用户下线',
  message: '是否下线当前用户?',
  showCancelButton: true,
  confirmButtonText: '确定',
  cancelButtonText: '取消',
  beforeClose: (action, instance, done) => {
    if (action === 'confirm') {
      done()
    } else {
      done()
    }
  }
}).then(() => {
  const axiosIns = axios.create({
    baseURL: 'http://localhost:8080/api/v1',
    timeout: 3000
  })
  axiosIns
    .delete(`login/${this.list[index].id}`)
    .then(res => {
      console.log(res)
    })
    .catch(err => {
      console.error(err)
    })
  this.list[index].online = false
  this.$message({
    message: `用户 ${this.list[index].id} 已下线`,
    type: 'success',
    duration: 2000,
    showClose: true
  })
})
Excel 表格
参见:
